
A systematic guide to impact, emotion, and sales incorporating the 7 golden Ws from criminalistics
In this article, you will learn about the basic principles and psychological background behind real estate photography and how real estate agents can use it to their advantage. You will also learn what you need to pay attention to in order to achieve MAXIMUM EFFECT and receive so many inquiries that you won’t be able to keep up with the expected FLOOD OF INQUIRIES! You’ll start to sweat!
- A systematic guide to impact, emotion, and sales incorporating the 7 golden Ws from criminalistics
- 1. Who is my target audience for real estate photography as a real estate agent?
- 2. What should be shown in the real estate photos?
- 2.2 What is deliberately NOT photographed in real estate photography
- 3. When is the perfect time to take real estate photos?
- 4. How are high-selling real estate photos created?
- 5. How can you create a positive feeling among real estate buyers?
- 6. What equipment is used for real estate photography and editing?
- 6.1 SLR or system camera – both work well for real estate photography
- 6.2 Crop factor vs. full frame – Sensor sizes in real estate photography
- 6.3 The most important lens in real estate photography: wide angle
- 6.4 Tripod: The most underrated professional tool for real estate photographers
- 6.5 Accessories for real estate photographers that really make sense
- 7. How to get the most out of your real estate sales photos—image editing as a tool for optimal sales
- 7.3 Why smartphone photos (almost always) cost money and have no place in real estate photography
- Conclusion
- Bibliography
- Related articles
1. Who is my target audience for real estate photography as a real estate agent?
(Target audience & perception)
Before you pick up your camera, ask yourself who your target audience actually is. This target audience has specific needs and preferences.
My advice: BEFORE you start photographing the property, consider the following:
- Who is my target audience? Owner-occupiers, investors, tenants, luxury clientele, families with school-age children, etc.
- What might appeal to the target audience?
But these potential buyers are not your only target group. There are two other groups of people you can successfully serve with real estate photography. These include the client and, of course, yourself.
So you are photographing the property for sale for three groups of people, namely:
- For the potential buyer
- For the client
- And for yourself
Real estate photography is not neutral documentation. It is one of the MOST EFFECTIVE marketing tools at your disposal.
An example:
Have you ever looked for a property yourself? Maybe just a vacation home? What was important to you, what did you pay attention to? If you are a family, you have different requirements than a couple without children or singles. But even more importantly, what are the highlights of the property? What is particularly great about it?
1.1 How real estate photography appeals to your potential buyers
Not every property is photographed for the same person. The aim is to “activate” the buyer and encourage them to make an ENQUIRY. No more, no less. This enquiry has nothing to do with a purchase or anything like that. It “merely” suggests interest.
The images have the task of conveying certain information or an overview on the one hand, and on the other hand (most importantly!) they should put the potential buyer in a positive emotional state in order to “activate” them!
An example:
Have you ever looked at pictures of landscapes or cities and thought, “I HAVE TO SEE THAT!” “I’D LOVE TO BE THERE RIGHT NOW!” Yes? Then you know what I mean. I am aware that with existing properties, the motif can only be optimized to a limited extent, but you can optimize the MOOD in the PICTURE! And that’s what I’m going to show you here.
1.2 Real estate photography for the client (owner/developer)
Imagine you are looking for a painter to paint your house. How do you proceed? What do you try to find out and why?
This is exactly how clients feel when they hire you to market their property. They will try to gather information about you. They want to know how good you are and whether you know your trade.
They are taking a certain RISK by hiring you. Why? People usually sell a property very rarely, if at all, only once in their lifetime. They have no experience and often seek advice from others or “fall back” on what they know.
Professional photos help you present yourself as a professional. Without many words, the customer immediately sees what they are getting.
Ed WOLKIS writes in his book: “People respond to great images, even if they don’t know why. People, smarter than you and I, spend ”beaucoup bucks“ on advertising with great graphics. Why? BECAUSE IT SELLS!” (You can find more information to the book and a link to the website from ED WOLKIS at the end of the article.)
It also takes the wind out of the sails of any commission negotiations. It also strengthens your position against the competition. Of course, it takes more than “just” professional photos to assert your position as a professional—but they have an immediate effect!
Unprofessional images, on the other hand, send subliminal messages such as:
- “This isn’t being marketed seriously.”
- “The real estate agent isn’t up to the task.”
- “Oh dear, I hope I hired the right one.”
➡️ High-quality photos reduce uncertainty among real estate sellers
and reinforce the feeling that:
“My property is in the hands of a PROFESSIONAL.”
1.3 For you as a real estate agent – it strengthens your brand and is self-promotion at the same time
1.3.1 Every real estate listing is advertising for YOU as a real estate agent
Every property you publish also says something about you:
- about your understanding of quality
- about your target group
- about your commitment to perfection
Photos are public references—whether you like it or not. And you should be proud of your references!
My tip: Stage the photo shoot! Make it a show—an EXPERIENCE for the customer—YOUR CUSTOMER should have a GREAT FEELING about you!
1.1.3 Commission protection for you as a real estate agent through perceived competence
As mentioned above, they protect your commission and take effect immediately. Give them as little ammunition as possible—NO room for negotiation!
👉 People negotiate less aggressively with professionals. Don’t give them any arguments that justify a reduction in commission.
Those who already demonstrate competence in their presentation:
- is questioned less often
- has to justify his commission less
- appears “worthy of praise”
Your high-quality real estate photos thus provide indirect commission protection for you as a real estate agent.
1.3.2 Perceived quality = perceived market value of your work as a real estate agent
Professional real estate photos make you appear more successful, better, and more desirable. Customers compare—SHINE brighter, better, and more beautifully than the competition!
➡️ You attract better properties and better clients. Everyone will want to sell their property through you.
2. What should be shown in the real estate photos?
(Content & selection)
Before you take your first picture, ask the owner to show you around the property. Ask them which room was/is their favorite. The owner usually knows their property best, so you can also ask them what the highlights are. And it is precisely these HIGHLIGHTS that you want to capture in your photos.
Before we discuss the technology behind photography, discover WHAT you should photograph.
There are different types of shots, these are:
- Overview shots
- Detailed shots
- Plans with dimensions
Real estate is usually photographed with a wide-angle lens. The focal length is specified in mm. This means that with a focal length of 10-20 mm, you are in the wide-angle range for cameras with a crop factor. With full-frame cameras, you are in the wide-angle range from approx. 15 mm. (This blog post does not discuss equipment; that will be covered in a later post.)
Once you have gained an overview, the property needs to be prepared. This means you can now confidently call on the client to fulfill their obligations. My experience in this regard has been consistently positive. The owner is given a “LET’S GET STARTED” feeling, which is absolutely positive. They can help sell their property.
Depending on the property and object, different steps need to be taken. If the property is still occupied, then
- It must be tidy, as if the president were coming to visit.
- At least a rough clean should be done—the mirrors should be clean, the dust on the dressers removed, cold spots on the fittings eliminated, etc.
- If there is a garden, at least the lawn should be mowed.
- And all objects that are not conducive to the photo should be removed, at least temporarily (this can also be done during the shoot – they should at least not be in the picture) – these objects can then be put back right away – but they have no place in the photo.
As a general rule, the property should be photographed from the outside and inside. A study that looked at the number of photos recommends posting between 8 and 12 photos online. No more, no less.
I wouldn’t stick to this number so strictly, but I do recommend not overdoing it. The most important thing is that the prospective buyer gets a FEELING for the property and starts to dream.
Don’t forget – your two best pictures should be used as the START PICTURE (this is your eye-catcher and should serve as a CALL-to-ACTION in the ad to get prospective buyers to “click in”) and at the END (sticks in the memory).
The kitchen, bathroom fixtures, etc. also serve to identify potential cost drivers during renovation (e.g., are the tiles still up to date, etc.).
If the interested party is missing pictures, they will become skeptical and feel that something is being hidden.
2.1 Details in real estate photography that communicate added value (materials, light, view)
Carefully selected detailed shots convey the quality and character of the property.
These include high-quality floor coverings, special surfaces (real wood parquet floors), a sensational view, luxury kitchen appliances, etc. Such images subconsciously support price acceptance because they convey value without needing to be explained.
It is important to exercise restraint here: details complement the overall effect—they do not replace room shots.
2.2 What is deliberately NOT photographed in real estate photography
Real estate photos are not a private memory album, but a marketing tool.
Therefore, the following applies:
- No pets (people often worry that pets such as cats or dogs will damage the flooring)
- No children or people
- No personal items with strong identifying characteristics
- No piles of trash, clutter, or distracting details
- Toilets where the toilet seat is not closed (looks as if it has been used recently)
Equally important: nothing that belongs to the property is retouched away. Honesty creates trust. The aim is to create a realistic but best possible representation—not a white lie that will later lead to disappointment during the viewing—as this will only waste your time and that of the prospective buyer.
Instead, the focus is on everything that makes the property unique and underlines its character: sense of space, light, proportions, location qualities, and architectural features.
3. When is the perfect time to take real estate photos?
(Timing & Lighting)
There is no such thing as the perfect time. It depends on what you want to photograph. For example, if you want to take an outdoor shot, it depends on the position of the sun and whether you want to feature the sun in your shot. If, on the other hand, you are photographing the entrance area and there is direct sunlight, the shadows can appear very harsh. In this case, it is better to take the photo when it is cloudy.
4. How are high-selling real estate photos created?
(Technique & Implementation)
A little bit of technique, a little bit of imagination, good equipment, a good photo program, and PRACTICE, PRACTICE, PRACTICE… and one more thing: PRACTICE!
Powerful real estate photos are not meant to sell; they are meant to generate inquiries. Sure, if they sell directly, that’s great, but it’s a multi-step sales process.
Psychology spoiler: A multi-stage real estate sale consists of the potential customer saying YES to the property several times. Nancy Harhut writes in her book that the more often the potential buyer has said YES beforehand, the higher the chance of closing the deal.
I also learned this in the financial industry where I used to work. Applied to real estate, this means that the photo should inspire the potential customer to DREAM. They should “fall in love” with it in their mind and absolutely want to view it – NOT MORE, NOT LESS.
During the viewing, the property must then “deliver.” This means that it should look like it does in the photos, and if you haven’t retouched anything and presented the property as you photographed it, then it will.
5. How can you create a positive feeling among real estate buyers?
This requires …
- Perspective, focal length, and line guidance
- Natural vs. artificial (NO FLASH) Combining light correctly
- Image composition according to psychological viewing habits
In other words:
- Show the property in its best light, literally and figuratively.
- Showcase the best features of the property.
- Present it in the best quality possible in terms of the photo itself.
- Take photos WITHOUT flash.
Before you begin, prepare the property. Turn on the lights—every lamp (floor lamp, kitchen light, etc.). This immediately creates a positive atmosphere.
“Show warm tones and let potential buyers immerse themselves in the property!”
Is there a wood-burning stove/Swedish stove? If so, light a fire in it, but only with the owner’s permission, of course. Basically, all you need is some firelighters and small pieces of wood to get the fire going. The main thing here is not the heat, but the fire and the temperature of the paint. It looks completely different when it is in use.
Do NOT take photos when it is dark, unless it is part of your plan (the image you have in your head). The blue hour is often more suitable than complete darkness.
Pay attention to the lines – that means – look through the camera, walk around and decide based on your gut feeling which angle is the most beautiful.
6. What equipment is used for real estate photography and editing?
(Tools & Quality)
6.1 SLR or system camera – both work well for real estate photography
Professional real estate photography does not require a specific camera brand, but rather reliability and control.
Whether you use a classic DSLR or a modern mirrorless camera:
The key is that you can work manually, shoot in RAW, and take clean series of photos. You do NOT need a professional camera—entry-level models are now so sophisticated that you can find one for less than €1,000 (for the camera body).
👉 It’s the picture that sells—not the camera body.
6.2 Crop factor vs. full frame – Sensor sizes in real estate photography
A common misconception: “Only full-frame is professional.” It always depends on the photographic purpose. Sure, a full-frame camera has many advantages—but also disadvantages, and the biggest disadvantage is the price of the camera (body) and lenses.
Note: The camera is not a status symbol, but a means to an end.
And another thing… Since most real estate agents take photos with their cell phones…
HOW DO YOU THINK YOU COME ACROSS TO YOUR CUSTOMERS WHEN YOU ARRIVE AT A PHOTO SHOOT WITH A LARGE CAMERA BAG AND TRIPOD instead of just reaching into your pocket and taking a few photos with your phone?
Briefly, the difference between the two sensor sizes:
- Full Frame
- More flexibility in terms of dynamics and low light
- More comfortable in very confined spaces
- More expensive (camera + lenses)
- Crop-Sensor (APS-C)
- Absolutely sufficient—especially at the beginning
- Affordable and good entry level
- Lighter equipment
- Excellent image quality for online portals and exposés
👉 For real estate, clean geometry and lighting are what count, not sensor size.
A good photographer will always choose full-frame. You can take great photos with cameras that have an APS-C sensor.
6.3 The most important lens in real estate photography: wide angle
In real estate photography, the lens is often more important than the camera. Most photos are taken with a wide-angle lens. Here are the key specifications:
- Ideal range: approx. 16–24 mm (full frame) or 10–16 mm (crop)
- Not too extreme → Distortions appear artificial.
- High sharpness right into the corners (high f-number)
- As little barrel distortion as possible (can be corrected with a special program such as Adobe Lightroom and should also be taken into account when purchasing the lens)
📌 Tip:
How to take photos with it: Far enough away to show the space—not so far that it looks suspicious—and most importantly, pay attention to the lines—where am I standing and how high is the camera?
6.4 Tripod: The most underrated professional tool for real estate photographers
A sturdy tripod is not an optional accessory, but a must-have. Saving money here is saving in the wrong place. The tripod should be strong enough to hold your camera securely and not give way, for example, by tilting downward.
What you can do with it and what it’s good for:
- Straight lines (avoid converging lines)
- No camera shake
- Perfect even in confined spaces (especially with a swiveling camera monitor or app shutter release)
- Exposure bracketing without camera shake and always the same image section
- Absolutely necessary for long exposures (blue hour, etc.)
👉 Tripod photos = complete control, impresses the client, and makes your work much easier!
6.5 Accessories for real estate photographers that really make sense
You don’t need a studio—but these things pay off:
- Remote shutter release or self-timer (to avoid camera shake)
- Spare battery & memory card (nothing is more unprofessional than having to stop shooting)
- Polarizing filter (optional, helpful for reflections and when photographing the sky)
- Graduated filter (optional, when photographing sunsets with direct sunlight—enables better and more even exposure in the image)
- Good bag—protects equipment, saves time, and looks super professional!
Everything else comes later, when workflow and demands grow.
7. How to get the most out of your real estate sales photos—image editing as a tool for optimal sales
Goal: Show the property as it is—not as it could be “embellished.”
Professional image editing is not a trick, but a tool for perception. You usually take pictures with your camera in JPEG and RAW format. JPEG is not suitable for editing; you need the RAW file (lossless file with the raw data of the photograph).
In this file, you can then adjust the exposure, temperature of the photo, and much more using a program suitable for photo editing—I use Adobe Lightroom for this! The program is not cheap, but it is excellent.
And please don’t forget – add YOUR logo everywhere – DISCREETLY and “negatively” multiplied (“transparent”).
Why? Once again, to advertise yourself as a real estate agent on the internet and to protect yourself from “theft” by others!
7.1 The color temperature of your real estate photography – almost the MOST IMPORTANT thing
The color temperature subconsciously influences whether a room is perceived as warm and inviting or cool and unwelcoming.
- Images that are too cold appear sterile, uninhabited, and emotionless.
- Images that are too warm quickly appear unnatural.
- The goal is to achieve a neutral, realistic warmth that inspires confidence.
- 👉 Buyers should think, “This is how the room will feel when I live there.”
7.2 Light and dark “spots” in real estate photography – the eye seeks balance
What the eye can do, technology CANNOT. So this problem needs to be solved. You can find out how to do this here.
Bright or overexposed spots usually occur around windows. These spots are distracting and can ruin a great picture. The easiest way to prevent this is to take a series of exposures and then merge them in Lightroom. This is called HDR photography.
Dark spots often occur in corners of rooms that are insufficiently lit. These spots can also be avoided by taking a series of exposures or corrected in Lightroom.
Without these “outliers,” the image appears much calmer and “tidier.” I have posted a comparison photo online below. Both have been edited. One was taken in HDR and the second was optimized as much as possible.
You can now see two images below, the left one (first) has been edited “normally” and the right one (second) has been merged in HDR with a series of 4 photos.
Which image is more pleasant to look at?

7.3 Why smartphone photos (almost always) cost money and have no place in real estate photography
At first glance, smartphone photos seem “okay,” but they are often unsuitable for marketing purposes.

This photo was taken with a iPhone 16e. A pretty good phone, but I don’t think that it is the right choice for real estate agents to do some advertising with it.
The next two photos were taken with a Nikon D500 camera and a Sigma wide-angle lens. See for yourself what the difference is. Which one do you like better?

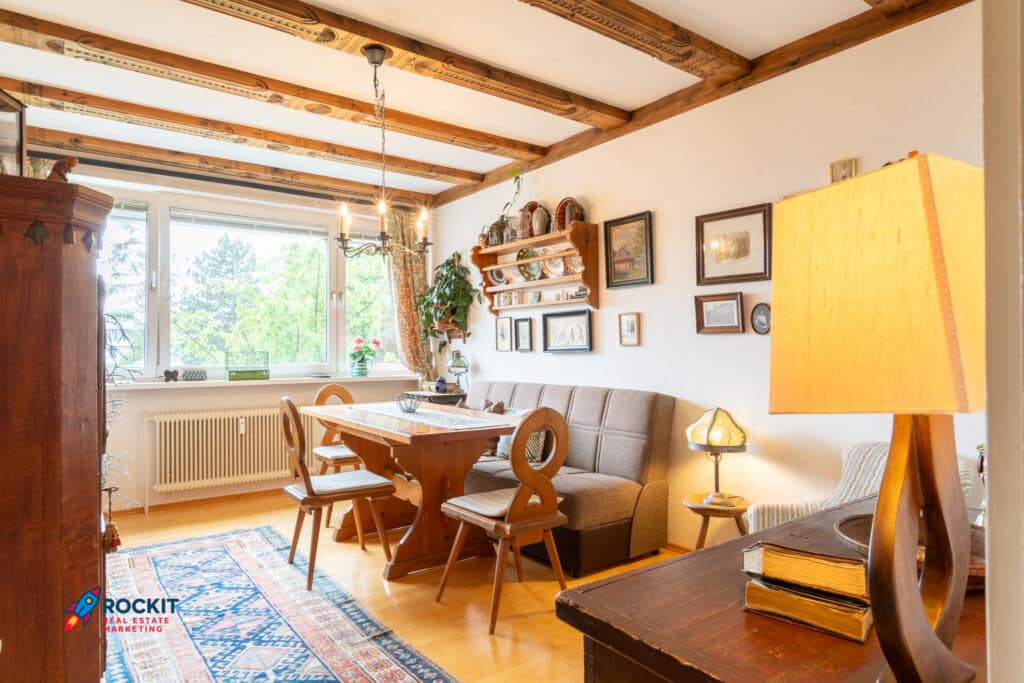
The photo above shows a lot of the room, while the one below focuses on the stove. The room is located in a house with four bedrooms and a large garden with a children’s climbing tower in a rural area with a good elementary school. For this reason, it was classified for the target group “young families.” That is why the Lego train was placed in the picture with the intention of inspiring future buyers to dream. They should imagine their children playing in front of the stove in the living room.

7.3.1 Why are smartphone photos unsuitable for marketing real estate?
How would you feel if a tradesperson came to your home carrying the CHEAPEST TOOLS you can buy at a discount store? How would you rate the quality of this tradesperson—even before they’ve done a single thing?
Cell phone photos damage YOUR image.
People tend to want to buy things from successful people. And a cell phone photographer definitely does not come across as successful.
The photos look unprofessional and subliminally communicate: I can’t do any better! It’s like a boxer openly signaling weakness to his opponent – even before the first punch is thrown.
This visual weakness boosts the buyer’s confidence.
Not in a positive sense, but tactically:
“He’s not a pro – I can definitely push down the price!”
“I hope he’s better at selling than he is at taking photos.
The client is often left feeling disillusioned:
The photos disappoint the client, there are significantly fewer viewings, trust is lost, and the client wonders what they are actually paying commission for and whether they should hire one of the other real estate agents, perhaps one who has already called them!
The consequences are measurable:
- Fewer clicks on the portals
- Fewer inquiries
- Longer marketing period
- Higher marketing costs as a result (costs of the portals)
- And ultimately: a decrease in the value of the property, at least in the perception of the market
7.3.2 In short:
Smartphone photos don’t save money—
they cost you reach, time, negotiating power, and ultimately the selling price.
It’s also often impossible to control the shot. Editing is difficult. Even if you can shoot in RAW, editing is limited due to the size of the file.
Why? Compare the lens of a digital camera with the lens of your smartphone. Do you notice anything? Compare the size. Then look at the sensor of the digital camera. You can’t see the sensor of your smartphone – and you don’t need to. Do you think it’s bigger?
The camera is also larger than the smartphone – but it can only film and take photos. So where do you have more photographic technology?
If you want to earn real money, invest in the equipment described above. With a maximum of €2,000, you’re sure to be in the game.
And one more thing… as a successful real estate agent, you need “depreciation items” in your accounting anyway!
Conclusion
Be the professional you are! You are a marketing genius… what do you think will happen when word gets around?
P.S.: Did you know that negative experiences are shared with about 10 people, while positive ones are only shared about 3 times? Do you think you will get a positive review if the customer is only moderately satisfied?
You can do it! Get the equipment—get the book from ED Wolkis „How To Take Photos That Move Houses, An Easy-Reading Guide for Real Estate Agents, Brokers, Architects, Designers, & anyone who needs to show a property in its best light.“ und starte durch!
One more word about the book: I wholeheartedly recommend this book, as I have read it myself and it is absolutely TOP. I DO NOT EARN A SINGLE CENT FROM RECOMMENDING IT. The book is simply brilliantly written, easy to understand, and perfectly complements my blog post for you. I can only warmly recommend it to you.
Bibliography
ED WOLKIS, „How To Take Photos That Move Houses, An Easy-Reading Guide for Real Estate Agents, Brokers, Architects, Designers, & anyone who needs to show a property in its best light.“
Want to learn more about how you can get more out of your business? Reduce your marketing costs and boost your revenue? Then check out my blog or go directly to the article.


Leave a Reply